Low Power RTOS Demo - Renesas RX100
Including ports for IAR, e2studio with GCC & e2studio with Renesas tools
[RTOS Ports]
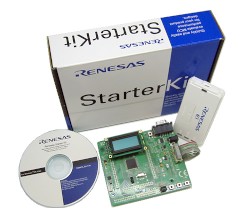
RX100 RSK (available June 2013)
Introduction
The application documented on this page demonstrates how the FreeRTOS
tick suppression
features can be used to minimise the power consumption of an
application running on an RX100 microcontroller
from Renesas. The RX100 is
designed specifically for use in applications that require low power
consumption.
The demo is provided with the following three build options:
-
IAR Embedded Workbench for RX
-
The Renesas e2studio Eclipse based IDE using the
Renesas RX compiler
-
The Renesas e2studio Eclipse based IDE using the
GNU GCC compiler
The projects are pre-configured to run on the official Renesas Starter Kit (RSK)
for the RX100.
IMPORTANT! Notes on using the FreeRTOS RX100 low power demo project
Please read all the following points before using this RTOS port.
- Source Code Organisation
- The Demo Application
- RTOS Configuration and Usage Details
See also the FAQ My application does not run, what could be wrong?
Source Code Organisation
The FreeRTOS zip file contains the source files for all the FreeRTOS
ports, and all the demo applications. Only a small subset of the files are needed by this
project.
See the Source Code Organization
section for a description of the downloaded files and information on creating a
new project.
The IAR Embedded Workbench project is called RTOSDemo_IAR.eww and is located in
the FreeRTOS/Demo/RX100-RSK_IAR directory.
The e2studio project that is configured to use the Renesas compiler is located
in the FreeRTOS/Demo/RX100-RSK_Renesas directory.
The build instructions section
of this page contains important information on preparing the Eclipse project
directory.
The e2studio project that is configured to use the GCC compiler is located
in the FreeRTOS/Demo/RX100-RSK_GCC directory.
The build instructions section
of this page contains important information on preparing the Eclipse project
directory.
The Renesas RX100 Demo Application
Hardware set up
The demo uses the LEDs, buttons and the potentiometer built onto the RX100 RSK
and no hardware setup is required.
Functionality
configCREATE_LOW_POWER_DEMO is a constant that is defined at the top of
FreeRTOSConfig.h. The low power demo is created when the project is built with
configCREATE_LOW_POWER_DEMO set to 1. A standard kernel only demo (without tick suppression)
is created when the project is built with configCREATE_LOW_POWER_DEMO set
to 0.
Functionality with configCREATE_LOW_POWER_DEMO set to 1
When configCREATE_LOW_POWER_DEMO is set to 1 main() calls main_low_power().
main_low_power() creates a very simple demo as follows:
-
Two tasks are created, an Rx task and a Tx task.
-
The Rx task blocks on an RTOS queue to wait for data, toggling LED 0 each time
data is received before returning to
block on the queue again. Note that current measurements will be higher
when the LED is on than when it is off.
-
The Tx task repeatedly enters the Blocked state for an amount of time
that is determined by the position of the potentiometer that is built onto
the RSK hardware. On exiting the blocked
state the Tx task sends a value through the RTOS queue to the Rx task (causing
the Rx task to exit the blocked state and toggle LED 0).
The constant mainSOFTWARE_STANDBY_DELAY is defined at the top of
main_low_power.c. If the value read from the potentiometer is less than or equal to
mainSOFTWARE_STANDBY_DELAY then the Tx task blocks for the equivalent
number of milliseconds. For example, if the analog value sampled from the
potentiometer is
2000, then the Tx task blocks for 2000ms. Blocking for a finite period
allows the RTOS kernel to stop the tick interrupt and place the RX100 into
its "deep sleep" low power mode.
If the value read form the potentiometer is greater than
mainSOFTWARE_STANDBY_DELAY then the Tx task blocks on a semaphore with
an infinite timeout (it blocks indefinitely). Blocking with an infinite timeout allows the RTOS kernel
to stop the tick interrupt and place the RX100 into its "software standby"
low power mode. Pressing any user button will generate an interrupt that
causes the RX100 to exit software standby mode. The interrupt service
routine 'gives' the semaphore on which the Tx task was blocked in order
to unblock the Tx task.
Using the demo when configCREATE_LOW_POWER_DEMO is set to 1
For optimum low power results the RX100 must be disconnected from the
debugger (the application must be executed 'stand alone').
-
Turn the potentiometer on the RX100 completely counter clockwise.
-
Program the RX100 with the application, then disconnect the programming/debugging
hardware to ensure power readings are not affected by any
connected interfaces.
-
Start the application running. LED 0 will toggle quickly because the
potentiometer is turned to its lowest value.
LED 1 is on only when the RX100 is not in a power saving mode. It will
appear (to the human eye) to be off because most execution time is spent
in a low power mode, and the low power mode is only ever exited very
briefly.
Led 2 is on only when the RX100 is in deep sleep mode. It will appear (to the human eye)
to be always on, again because most execution time is spent in the deep sleep mode.
NOTE: The power consumption measured when in the deep sleep mode
is affected by having LED 2 on.
-
Slowly turn the potentiometer in the clockwise direction. This will
increase the value read from the potentiometer, which will increase the
time the Tx task spends in the Blocked state, which will therefore also
decrease the frequency at which the Tx task sends data to the queue (and
the rate at which LED 0 is toggled).
-
Keep turning the potentiometer in the clockwise direction. Eventually
the value read from the potentiometer will go above
mainSOFTWARE_STANDBY_DELAY, causing the Tx task to block on the semaphore
with an infinite timeout. The RTOS will place the RX100 microcontroller
into its software standby mode.
LED 0 will stop toggling because the Tx task is
no longer sending to the queue. LED 1 and LED 2 will both be off because
the RX100 is neither running or in deep sleep mode (it is in software
standby mode).
NOTE: Unlike when in deep sleep mode, when the
RX100 is in software standby mode all the LEDs are turned off. This is
done to ensure the measured power consumption is not adversely affected
by the LEDs.
-
Turn the potentiometer counter clockwise again to ensure its value goes
back below mainSOFTWARE_STANDBY_DELAY.
-
Press any of the three buttons to generate an interrupt. The interrupt
will take the RX100 out of software standby mode, and the interrupt
service routine will unblock the Tx task by 'giving' the semaphore. LED 0
will start to toggle again.
RTOS implementation when configCREATE_LOW_POWER_DEMO is set to 1
Turning the tick interrupt off allows the microcontroller to remain in a low
power mode until such time that a task has to leave the Blocked state and execute. If the
RTOS tick interrupt was not suppressed in this way the microcontroller would have to
periodically exit the low power mode to process the RTOS ticks.
-
In this demo the LEDs are turned on and off by the application defined
pre and post sleep macros (see the definitions of configPRE_SLEEP_PROCESSING() and
configPOST_SLEEP_PROCESSING() in FreeRTOSConfig.h).
The macros can be extended to improve
power consumption further by taking additional power saving steps. For
example the pre sleep macro (called by the RTOS before it places the
RX100 into a low power state) could switch off the analog input used to
read the potentiometer, and ensure other microcontroller pins are
in a state that optimises power consumption. The post sleep macro (called
by the RTOS when the RX100 exits a low power state) could then be used
to return the RX100 to its pre-sleep state.
-
The standard RTOS RX port defaults to using the compare match timer (CMT) to generate
the RTOS tick interrupt, but the CMT is halted when the RX100 enters the
software standby low power mode. Therefore, the demo only enters software standby
mode when all the application tasks are blocked indefinitely (without a timeout).
This restriction can be removed by generating the tick interrupt from an external
time source (such as a watch crystal) instead of the CMT.
-
The RX100 will exit
software standby mode when an interrupt is received, but because the CMT
was halted (see the bullet point above about using an external time source in place
of the CMT) the RTOS does not know how much time elapsed between entering
and subsequently exiting the software standby low power state. As above,
using an external time source in place of the CMT will remove this
restriction. In addition, the application defined post sleep macro can
be used to adjust the RTOS tick count to the nearest 1/64th of a second
from the time maintained by the real time clock (RTC).
Functionality with configCREATE_LOW_POWER_DEMO set to 0
When configCREATE_LOW_POWER_DEMO is set to 0 main()
calls main_full(). main_full() creates a comprehensive test and demo application
that demonstrates:
The created tasks are from the set of standard demo
tasks. Standard demo tasks are used by all FreeRTOS port demo applications.
They have no specific functionality, and are created just to demonstrate how to use the FreeRTOS API,
and test the RTOS port. The following tasks and timers are created in addition
to the standard demo tasks:
-
"Reg test" tasks
These fill the registers with known values, then
repeatedly check that each register still contains its expected value for
the lifetime of the tasks. Each task uses different values. The tasks run
with very low priority so get preempted very frequently. A check variable
is incremented on each iteration of the test loop. A register containing an
unexpected value is indicative of an error in the context switching
mechanism and will result in a branch to a null loop - which in turn will
prevent the check variable from incrementing any further and allow the check
timer (described below) to determine that an error has occurred. The nature
of the reg test tasks necessitates that they are written in assembly code.
-
"Check Timer" and Callback Function
The check timer period is initially
set to three seconds. The check timer callback function checks that all the
standard demo tasks are not only still executing, but are executing without
reporting any errors. If the check timer discovers that a task has either
stalled, or reported an error, then it changes its own period from the
initial three seconds, to just 200ms. The check timer callback function
also toggles LED 0 each time it is called. This provides a visual
indication of the system status: If the LED toggles every three seconds,
then no issues have been discovered. If the LED toggles every 200ms, then
an issue has been discovered with at least one task.
-
Create the directory structure required by the Eclipse managed make system
by executing the appropriate CreateProjectDirectoryStructure.bat batch file.
If you are using e2studio with the Renesas compiler then execute
FreeRTOS/Demo/RX100-RSK_Renesas/CreateProjectDirectoryStructure.bat.
If you are using e2studio with the GCC compiler then execute
FreeRTOS/Demo/RX100-RSK_GCC/CreateProjectDirectoryStructure.bat.
-
Open e2studio and either create a new or select an existing workspace.
-
Select "Import" from e2studio's "File" menu, then in the Import dialog
box select "General | Existing Projects Into Workspace" then click "Next".
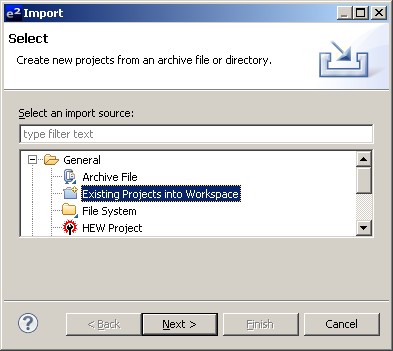
Select "Existing Project Into Workspace"
-
In the import dialog box browse to the FreeRTOS/Demo/RX100-RSK_Renesas directory
to use the Renesas compiler, or the FreeRTOS/Demo/RX100-RSK_GCC directory
to use the GCC compiler, ensure the project is selected in the
"Projects" window, and click Finish to complete the import process.
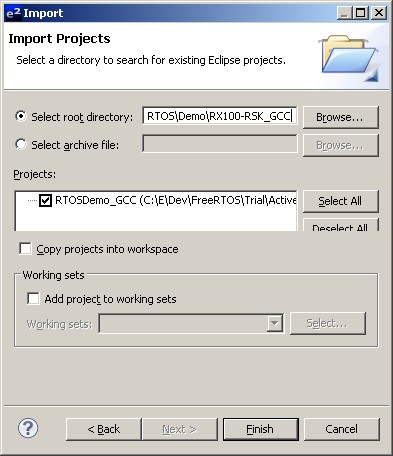
Browsing to the project to import (GCC project depicted)
-
Open FreeRTOSConfig.h, and set configCREATE_LOW_POWER_DEMO to generate either
the tickless low power demo, or the full test and demo application, as
required.
-
Select "Build All" from e2studio's "Project" menu.
-
Ensure the target hardware is connected to the host computer through the
E1 USB interface (which may come as part of the RSK, or may need to be
purchased separately).
-
Click the "Debug" speed button to start a debug session.

The speed button used to start a
debug session from within Eclipse
-
Open /FreeRTOS/Demo/RX100-RSK_IAR/RTOSDemo_IAR.eww from within the
IAR Embedded Workbench IDE.
-
Open FreeRTOSConfig.h, and set configCREATE_LOW_POWER_DEMO to generate either
the tickless low power demo, or the full test and demo application, as
required.
-
Select "Build All" from the IDE's "Project" menu.
-
Ensure the target hardware is connected to the host computer through the
E1 USB interface (which may come as part of the RSK, or may need to be
purchased separately).
-
Select "Download and Debug" from the IDE's "Project" menu to start a
debug session.
RX100 RTOS port specific configuration
Configuration items specific to this demo are contained in FreeRTOSConfig.h located
in the project directory. The
constants defined in these file can be edited to suit your application. In particular -
- configTICK_RATE_HZ
This sets the frequency of the RTOS tick. The supplied value of 1000Hz is useful for
testing the RTOS kernel functionality but is faster than most applications need. Lowering this frequency will improve efficiency.
- configKERNEL_INTERRUPT_PRIORITY
This defines the interrupt priority used by the RTOS kernel for the timer and software interrupts. This should always be set to
the lowest interrupt priority, which for the RX100 is 1. See
the configuration pages for more information.
- configMAX_SYSCALL_INTERRUPT_PRIORITY
This defines the maximum interrupt priority from which FreeRTOS API functions can be called. Interrupts at or below this
priority can call FreeRTOS API functions provided that the API function ends in 'FromISR'. Interrupts above this
priority cannot call any FreeRTOS API functions but will not be effected by anything the RTOS kernel is doing. This makes
them suitable for functionality that requires very high temporal accuracy. See
the configuration pages for more information.
The RX100 port layer #defines 'BaseType_t' to 'long'.
Writing interrupt service routines (ISRs)
Interrupts can be written using the standard compiler syntax. See the function
vButtonInterrupt1() in main_low_power.c for an example specific to the compiler
being used.
Often an ISR wants to cause a context switch so the task that is returned to when
the ISR completes is different to the task that the ISR interrupted. This would
be the case if the ISR caused a task to unblock, and the unblocked task had a
priority above that of the task that was already in the Running state. This
can be achieved by calling portYIELD_FROM_ISR(), which takes a single parameter.
The parameter should be 0 if a context switch is not required, or non-zero if
a context switch is required. This is demonstrated in the code below:
void Dummy_IRQHandler(void)
{
long lHigherPriorityTaskWoken = pdFALSE;

    /* Clear the interrupt if necessary. */
    Dummy_ClearInterruptPendingBit();

    /* This interrupt does nothing more than demonstrate how to synchronise a
    task with an interrupt.  A semaphore is used for this purpose.  Note
    lHigherPriorityTaskWoken is initialised to zero. */
    xSemaphoreGiveFromISR( xTestSemaphore, &lHigherPriorityTaskWoken );

    /* If there was a task that was blocked on the semaphore, and giving the
    semaphore caused the task to unblock, and the unblocked task has a priority
    higher than the current Running state task (the task that this interrupt
    interrupted), then lHigherPriorityTaskWoken will have been set to pdTRUE
    internally within xSemaphoreGiveFromISR().  Passing pdTRUE into the
    portYIELD_FROM_ISR() macro will result in a context switch being pended to
    ensure this interrupt returns directly to the unblocked, higher priority,
    task.  Passing pdFALSE into portYIELD_FROM_ISR() has no effect. */
    portYIELD_FROM_ISR( lHigherPriorityTaskWoken );
}
Resources used by FreeRTOS
FreeRTOS requires exclusive use of the software interrupt.
By default the RTOS kernel uses the compare match timer (CMT) to generate the RTOS tick.
The application writer can define configSETUP_TICK_INTERRUPT() (in
FreeRTOSConfig.h) such that their own tick interrupt configuration is used
in place of the default. For example, if the application writer creates a function
called MyTimerSetup() that configures an alternative timer to generate an interrupt
at the required frequency, then adding the following code to FreeRTOSConfig.h
will cause MyTimerSetup() to be called in place of the default timer configuration:
#define configSETUP_TICK_INTERRUPT() MyTimerSetup()
NOTE 1: The default tick suppression implementation assumes the use of the
CMT timer.
NOTE 2: The way the tick interrupt is installed is dependent on the compiler
used:
-
When using the GCC compiler: vPortTickISR() must be installed as the handler for whichever interrupt
is used to generate the RTOS tick. In this demo vPortTickISR() is installed
as the CMT0 interrupt handler.
-
When using IAR and Renesas compilers: The constant configTICK_VECTOR must be set to the vector
used by the peripheral that generates the tick interrupt. configTICK_VECTOR is
defined in FreeRTOSConfig.h. In this demo configTICK_VECTOR is
set to VECT_CMT0_CMI0 as the CMT0 peripheral generates the tick interrupt.
Switching between the pre-emptive and co-operative RTOS kernels
Set the definition configUSE_PREEMPTION within RTOSDemo/FreeRTOSConfig.h to 1 to use pre-emption or 0
to use co-operative. The full demo application may not execute correctly when the co-operative RTOS scheduler is
selected.
Compiler options
As with all the ports, it is essential that the correct compiler options are used. The best way to ensure this is to base your
application on the provided demo application files.
Memory allocation
Source/Portable/MemMang/heap_4.c is included in the RX100 demo application project to provide the memory
allocation required by the RTOS kernel.
Please refer to the Memory Management section of the API documentation for
full information.
Miscellaneous
Note that vPortEndScheduler() has not been implemented.