TI SimpleLink CC3220 RTOS Demo
Using the FreeRTOS Cortex-M port for Code Composer (CCS)
[RTOS Ports]
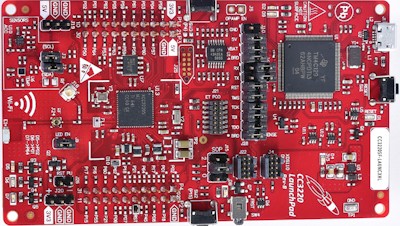
The SimpleLink CC3220 LaunchPad Development Kit
Preamble
Note: The CC3220 demo is not yet included in the
main FreeRTOS download. It will be included in the next FreeRTOS release. Until
that time the source code is available in a separate zip file download.
Introduction
This page documents the Code Composer Studio (CCS) demo application that targets the
Texas Instruments SimpleLink CC3220 WiFi MCU. The CC3220SF part has an ARM Cortex-M4
core, 1MB Flash, 256KB of RAM and enhanced security features.
Note: Even though the CC3220 has an ARM Cortex-M4 core, it does not have a
floating point unit (FPU), and therefore uses the FreeRTOS Cortex-M3 port.
The demo project is pre-configured to run on the SimpleLink Wi-Fi CC3220SF
Wireless Microcontroller LaunchPad Development Kit, and can be configured to
create either a simple blinky demo, or a comprehensive test and demo application.
The blinky demo uses FreeRTOS's tickless idle mode to reduce power consumption.
Stopping the RTOS tick interrupt allows the microcontroller to remain in a power
saving state until either an interrupt occurs, or it is time for the RTOS kernel
to transition a task into the Ready state. Note that only the generic ARM
Cortex-M tickless implementation is demonstrated. Tailoring the tickless implementation
so it uses CC3220 specific clocks and low power modes will greatly increase the power saving
that can be achieved.
See the Low Power Support
and the Low Power RTOS For ARM Cortex-M MCUs
pages for further information.
IMPORTANT! Notes on using the TI CC3220 SimpleLink ARM Cortex-M4F Demo
Please read all the following points before using this RTOS port.
- Source Code Organisation
- The Demo Application
- RTOS Configuration and Usage Details
See also the FAQ My application does
not run, what could be wrong?
Source Code Organisation
The FreeRTOS download contains the source code for every FreeRTOS port and
all the demo applications, so contains a lot more files than are required by the CC3220 SimpleLink
demo. See the Source Code Organization
section of this website for a description of the downloaded files.
CCS uses the Ecliplse IDE,
so the CCS project has the normal Eclipse name .project. The
project is located in the
/FreeRTOS/Demo/CORTEX_M4_SimpleLink_CC3220SF_CCS directory.
Building and Running the CCS3220 SimpleLink RTOS Application
The RTOS demo projects can be configured to build either
a simple blinky project that also demonstrates FreeRTOS's generic ARM Cortex-M tickless low
power mode, or a comprehensive test and demo application. The constant
configCREATE_SIMPLE_TICKLESS_DEMO, which is located at the top of the
project's FreeRTOSConfig.h file, is used
to switch between the two.
-
The simple tickless demo is created if configCREATE_SIMPLE_TICKLESS_DEMO
is set to 1.
-
The comprehensive demo is created if configCREATE_SIMPLE_TICKLESS_DEMO
is set to 0.
Note the comments at the top of this page about the
difference in power saving that can be achieved by the demonstrated generic
tickless implementation when compared to what could be achieved using a CC3220
specific tickless implementation.
The demo uses an LED built onto the Launchpad development kit, so no
hardware setup is required.
Note: The CCS project references files using relative paths. The project may
fail to build if a directory path is changed or if a file is moved. Eclipse's
'export' features can be used to convert the project into a stand-alone project
that only uses directories under the directory in which the .project file is located.
-
Connect the Launchpad development kit directly to the host computer
(the computer running CCS) using the hardware's USB connector - no other debug
interface is required.
-
Start the CCS Eclipse IDE, and either create a new or select an existing
workspace when prompted.
-
Select "Import" from the IDE's "File" menu. The dialogue box shown below
will appear. Select "Code Composer Studio->CCS Projects", as shown below.
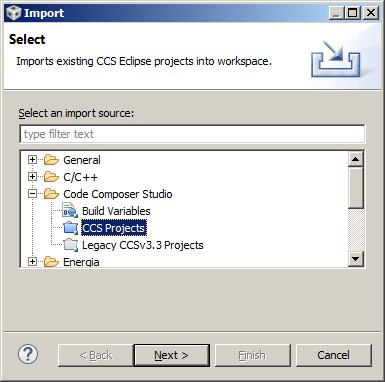 The dialogue box that appears when "Import" is first clicked
-
In the next dialogue box, select /FreeRTOS/Demo/CORTEX_M4_SimpleLink_CC3220SF_CCS
as the root directory. Make sure the RTOSDemo project is checked in the "Projects" area,
and that the Copy Projects Into
Workspace box is not checked, before clicking
the Finish button (see the image below for the correct check box states).
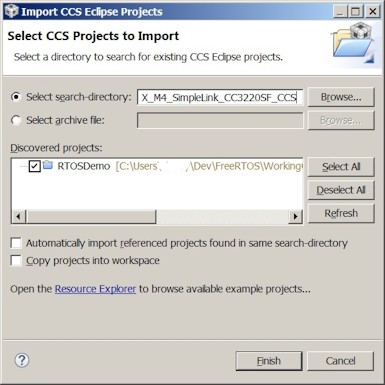 Make sure RTOSDemo is checked, and "Copy projects into workspace" is not checked
-
Select "Build All" from the CCS Eclipse "Project" menu to build
the demo project.
-
Select "Debug" from the Eclipse "Run"
menu to program the microcontroller's flash memory and start a debug
session.
Demo Application Functionality
The simply blinky example, using tick-less operation
The simple tickless example is created when configCREATE_SIMPLE_TICKLESS_DEMO is set
to 1. configCREATE_SIMPLE_TICKLESS_DEMO is defined at the top of FreeRTOSConfig.h.
The FreeRTOS tickless idle mode stops the periodic RTOS tick interrupt during
idle periods (periods when there are no application tasks that are able to execute).
The blinky example creates two tasks that only unblock once every second, so the
tick interrupt is stopped for the majority of the execution time.
Stopping the RTOS tick interrupt allows the microcontroller to remain in a power
saving state until either an interrupt occurs, or it is time for the RTOS kernel
to transition a task into the Ready state.
Note the comments at the top of this page about the
difference in power saving that can be achieved by the demonstrated generic
tickless implementation when compared to what could be achieved using an CC3220
specific tickless implementation. The generic tickless idle
mode uses the SysTick clock, which is fast and only 24-bits, and therefore
overflows many times between the demo task entering and then subsequently exiting
the Blocked state - and each overflow generates an interrupt.
Setting configCREATE_SIMPLE_TICKLESS_DEMO to 1 results in main() calling
main_blinky():
-
The main_blinky() Function:
main_blinky() creates a queue, a queue send task, and a queue receive
task, before starting the scheduler.
-
The Queue Send Task:
The queue send task is implemented by the prvQueueSendTask() function in main_blinky.c.
prvQueueSendTask() sends the value 100 to the queue every second.
-
The Queue Receive Task:
The queue receive task is implemented by the prvQueueReceiveTask() function
in main_blinky.c.
prvQueueReceiveTask() blocks to wait for data to arrive on the queue.
Each time the value 100 is received from the queue it flashes the LED.
As data is sent to the queue every second, the LED will flash every
second.
The comprehensive test and demo application
The comprehensive example is created when configCREATE_SIMPLE_TICKLESS_DEMO is set
to 0. configCREATE_SIMPLE_TICKLESS_DEMO is defined in FreeRTOSConfig.h.
Setting configCREATE_SIMPLE_TICKLESS_DEMO to 0 results in main() calling
main_full():
-
The main_full() Function:
main_full() creates a set of standard demo tasks,
the Register Test tasks, and starts the
scheduler.
-
The "Reg Test" Tasks:
The reg test tasks test the context switching mechanism by filling each
general purpose microcontroller register with a known value, then
continuously checking that each register maintains its expected value for
the lifetime of the task.
-
The "Check" Task:
The "Check" task monitors the status of all the other tasks in
the system, looking for a task either stalling or reporting an error.
It toggles an LED each time it is called.
If the LED is toggling every three seconds then the check task has determined
the demo is running as expected. If the LED
is toggling every 200ms then at least one error has been found.
Interrupt service routines
Priority assignment
Attention please!: See the page dedicated to setting interrupt priorities on ARM Cortex-M devices. Remember that ARM Cortex-M cores use
numerically low priority numbers to represent HIGH priority interrupts. This
can seem counter-intuitive and is easy to forget! If you wish to assign an
interrupt a low priority do NOT assign it a priority of 0 (or other low numeric
value) as this will result in the interrupt actually having the highest priority
in the system - and therefore potentially make your system crash if this
priority is above configMAX_SYSCALL_INTERRUPT_PRIORITY. Also, do not leave
interrupt priorities unassigned, as by default they will have a priority of 0
and therefore the highest priority possible.
The lowest priority on a ARM Cortex-M core is in fact 255 - however different
ARM Cortex-M microcontroller manufacturers implement a different number of priority bits and supply library
functions that expect priorities to be specified in different ways. For example,
the TI CC3220 ARM Cortex-M4 SimpleLink MCU implements 3 priority bits, which
allows for a maximum of 8 different priority levels (0 to 7 inclusive). The lowest priority being
the highest number. Some library functions will use the numeric value 7 as the
lowest priority, while others will use the numeric value 224 as the lowest (which
is 7 << 5, and how the ARM Cortex-M sees the value internally in the interrupt controller).
These two numbers are defined by configLIBRARY_LOWEST_INTERRUPT_PRIORITY and
configKERNEL_INTERRUPT_PRIORITY respectively in FreeRTOSConfig.h. The highest priority
that can be assigned is always zero.
It is also recommended to ensure that all priority bits are assigned as
being preemption priority bits, and none as sub priority bits.
Implementing interrupt service routines
Interrupt service routines that cause a context switch have
no special requirements. An example is provided below:
void Dummy_IRQHandler(void)
{
long lHigherPriorityTaskWoken = pdFALSE;

    /* Clear the interrupt if necessary. */
    Dummy_ClearITPendingBit();

    /* This interrupt does nothing more than demonstrate how to synchronise a
    task with an interrupt.  A task notification is used for this purpose.  Note
    lHigherPriorityTaskWoken is initialised to zero. Only FreeRTOS API functions
    that end in "FromISR" can be called from an ISR! */
    vTaskNotifyGiveFromISR( xTaskToNotify, &lHigherPriorityTaskWoken );

    /* If the task with handle xTaskToNotify was blocked waiting for a notification,
    and giving the notification caused the task to unblock, and the unblocked
    task has a priority higher than the current Running state task (the task that
    this interrupt interrupted), then lHigherPriorityTaskWoken will have been set
    to pdTRUE internally within vTaskNotifyGiveFromISR().  Passing pdTRUE into
    the portYIELD_FROM_ISR() macro will result in a context switch being pended
    to ensure this interrupt returns directly to the unblocked, higher priority,
    task.  Passing pdFALSE into portYIELD_FROM_ISR() has no effect. */
    portYIELD_FROM_ISR( lHigherPriorityTaskWoken );
}
RTOS port specific configuration
Configuration items specific to these demos are contained in the FreeRTOSConfig.h
file located in the same directory as the project file. The
constants defined in FreeRTOSConfig.h can be edited to meet the needs of your application. In particular -
Each port #defines 'BaseType_t' to equal the most efficient data type for that
processor. All ARM Cortex-M4F ports define BaseType_t to be of type long.
Note that vPortEndScheduler() has not been implemented.
Memory allocation
Source/Portable/MemMang/heap_4.c is included in the ARM Cortex-M4F demo application project to provide the memory
allocation required by the RTOS kernel.
Please refer to the Memory Management section of the API documentation for
full information.
Copyright (C) Amazon Web Services, Inc. or its affiliates. All rights reserved.
|