Renesas (Hitachi) H8/S RTOS Port
[RTOS Ports]
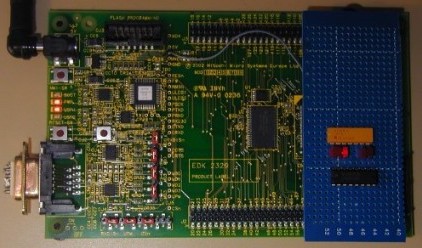 EDK2329 with LED adaptor card and loopback connector
The port was developed on a EDK2329
prototyping embedded computer direct from Renesas (instructions are provided should you wish to use an alternative development board). It uses the open
source GNU H8 C compiler along with the free HEW (High Performance Embedded Workbench) GUI - both are available for free download from
KPIT Cummins.
The FreeRTOS source code download includes a comprehensive demo application for the H8/S2329 RTOS port
which creates and executes 33 real time tasks, including the idle task and two serial port communications tasks.
IMPORTANT! Notes on using the Renesas (Hitachi) H8/S RTOS port
Please read all the following points before using this RTOS port.
- Source Code Organisation
- The Demo Application
- Configuration and Usage Details
See also the FAQ My application does not run, what could be wrong?
Source Code Organisation
The FreeRTOS source code download contains the source code for all the FreeRTOS ports.
See the Source Code Organization section for a description of the
downloaded files and information on creating a new project.
The HEW workspace for the H8/S port can be found in the FreeRTOS/Demo/H8S directory. This should be opened from within
the HEW IDE. Please see the comments below on using the HEW.
The Demo Application
The FreeRTOS source code download includes a fully preemptive multitasking demo application for the H8S GCC RTOS port.
Demo application hardware setup
The demo application includes tasks that send and receive characters over the serial port. The characters sent by one task
need to be received by another - if any character is missed or received out of sequence an error condition is flagged. A
loopback connector is required on the serial port for this mechanism to operate (simply connect pins 2 and 3 together on
the serial port connector).
The demo application utilises one of the LEDs built onto the prototyping board. This single LED is enough to check that
the demo is functioning correctly, but for best effect an extra five LEDs are
required. These should be connected to the P2.3 to P2.7 processor pins. These pins are set as outputs when the application
is executed.
The EDK2329 jumpers should be configured for single chip mode (mode 7), with the external SRAM disabled.
Functionality
The demo application creates 33 of the standard demo application real time tasks (see the
demo application section for details of the individual tasks).
When executing correctly the demo application will behave as follows:
- LEDs P2.3, P2.4 and P2.5 are under control of the 'flash' tasks. Each will flash at a constant frequency, with LED P2.3
being the fastest and LED P2.5 being the slowest.
-
When the loopback connector is in place every character transmitted by the ComTest Tx task is received by the ComTest
Rx task. Each transmitted character causes LED P2.6 to toggle, each correctly received character causes LED P2.7 to
toggle. LED P2.7 will only toggle if the received character matches the character the ComTest Rx task expected to receive.
- Not all the tasks update an LED so have no visible indication that they are operating correctly.
Therefore a 'Check' task is created whose job it is to ensure that no errors have been detected in any of the other tasks.
LED P2.1 - which is built onto the EDK2329 PCB and marked USR1 - is under control of the 'Check' task. Every three
seconds the 'Check' task examines all the tasks in the system to ensure they are executing without error. It
then toggles LED P2.1. If LED P2.1 is toggling every three seconds then no errors have ever been detected.
The toggle rate increasing to 500ms indicates that the 'Check' task has
discovered at least one error. This mechanism can be checked by removing the loopback connector from the serial port
(described above), and in doing so deliberately generating an error.
Notes on using the HEW IDE
- Path names
HEW projects cannot include source files below the project directory without the use of absolute path names.
Before opening the HEW project you will have to edit the paths to suite your installation.
Open the file FreeRTOS/Demo/H8S/RTOSDemo/RTOSDemo.hwp
in a text editor and replace every occurrence of the path string "e:\dev\freertos" with the correct path for
your installation.
- Path to GNU libraries
After opening the FreeRTOS HEW project for the first time you must set the correct library search path for your GNU tools
installation.
This is done using the "Options | Linker | Archives" menu option. For example,
to use the GNUH8-v0403 tool chain change the path to $(TCINSTALL)\h8300-elf\lib\gcc\h8300-elf\3.4-GNUH8_v0403\h8300s.
To use the GNUH8-v0501 tool chain change the path to $(TCINSTALL)\h8300-elf\lib\gcc\h8300-elf\3.4-GNUH8_v0501\h8300s.
- Compiler options
The HEW ignores the configured compiler options until the options dialogue has been opened and closed in the IDE. To use the correct
compiler options simply open the options dialogue (select Compiler from the Build menu), then close it again. Do not change any options
until you are familiar with the port.
- Dependencies scanning
The HEW will update the dependencies list of each source file before every build. This scanning
process ignores preprocessor directives. The file FreeRTOS/Source/include/portable.h contains a list of
header file includes - one for each port. A #ifdef is used to ensure the correct header is used when
building a particular port, but the HEW will attempt to scan every header. While this does not prevent the demo
from building it will greatly increase the build time and results in a lot of warning messages.
To prevent this
you can comment out all the headers that are not relevant to the H8/S port. For example, the header actually used by the
H8/S port is included by the following lines:
#ifdef GCC_H8S
   #include "../../Source/portable/GCC/H8S2329/portmacro.h"
#endif
and these lines must be left unmodified. The header for (for example) the GCC ARM7 port is included by the
following lines:
#ifdef GCC_ARM7
   #include "../../Source/portable/GCC/ARM7/portmacro.h"
#endif
and these lines can be commented out (or deleted if you have no intention of using the ARM7 port).
Building the demo application
The demo application project contains two build configurations, a debug build for use with the HEW simulator and a release build for
downloading to the processor flash memory.
To create and simulate a debug build
-
After updating the path names as described above, open the RTOSDemo workspace FreeRTOS/Demo/H8S/RTOSDemo.hws.
-
From the drop down lists, select the Debug build configuration and the Simulator debug session.
 Selecting the Debug configuration and Simulator session Selecting the Debug configuration and Simulator session
-
Select 'Build All' from the 'Build' menu. The project should build with no errors or warnings.
-
Upon completion of the build a dialogue box will appear with the question "Ok to download module?", click Yes
to load the build into the simulator.
-
The simulator can then be used to step through the code and set break points in the normal manner. However,
the simulator does not simulate the peripherals. Therefore the RTOS tick will not be incremented and eventually
only the idle task will execute.
To create and download a release build
-
After updating the path names as described above, open the RTOSDemo workspace FreeRTOS/Demo/H8S/RTOSDemo.hws.
-
From the drop down lists, select the Release build configuration and the Release session.
 Selecting the Release configuration and session Selecting the Release configuration and session
-
Select 'Build All' from the 'Build' menu. The project should build with no errors or warnings.
-
Connect the EDK2329 target hardware to your host computer with a suitable RS232 cable.
-
Power up the target then place the processor into boot mode by pressing the button marked 'Boot'. The boot LED with
illuminate.
-
Connect the HEW to the target using the connect button, highlighted below.
 The Connect speed button The Connect speed button
-
Once successfully connected the flash image can be downloaded by using the download button, highlighted below.
 The Download speed button The Download speed button
The file to download is called RTOSDemo.mot and will be located in the
FreeRTOS/Demo/H8S/RTOSDemo/Release directory. Once the download has completed you can disconnect the HEW
from the target using the disconnect button (next to the connect button).
-
To run the application first power down the board, remove the RS232 cable and attach the loopback connector, then
power up again.
RTOS port specific configuration
Configuration items specific to this port are contained in FreeRTOS/Demo/H8S/FreeRTOSConfig.h. The constants
defined in this file can be edited to suit your application. In particular - the definition configTICK_RATE_HZ is used to set
the frequency of the RTOS tick. The supplied value of 1000Hz is useful for testing the RTOS kernel functionality but is faster
than most applications require. Lowering this value will improve efficiency.
Each port #defines 'BaseType_t' to equal the most efficient data type for that processor. This port defines
BaseType_t to be of type char.
Note that vPortEndScheduler() has not been implemented.
Interrupt service routines
Only the I bit in the CCR is used to mask interrupts. The EXR is not used.
An interrupt service routine that does not cause a context switch has no special requirements and can be written as per the
normal GNU H8/S syntax.
For example:
    static void vAnISR( void ) __attribute__ ( ( interrupt_handler ) );

    static void vAnISR( void )
    {
        /* ISR C code goes here. */
    }
Often you will require an interrupt service routine to cause a context switch. For example a serial port character being
received may wake a high priority task that was blocked waiting for the character. If the ISR interrupted a lower priority
task then it should return immediately to the woken task. Special syntax is required to allow an ISR to have
this capability:
- The ISR must be declared using the saveall attribute.
- The ISR must include the portENTER_SWITCHING_ISR() macro as the very first line in the function, and the
portEXIT_SWITCHING_ISR() macro as the very last line in the function.
- Variables declared within the ISR must be declared as static.
The portEXIT_SWITCHING_ISR() macro takes a single parameter - if this parameter is non-zero a context switch will occur.
An example interrupt service routine that can cause a context switch:
    /* The ISR is defined using both the saveall and interrupt_handler attributes. */
    void vASwitchingISR( void ) __attribute__ ( ( saveall, interrupt_handler ) );

    void vASwitchingISR( void )
    {
        /* This MUST be the first line in the function. */
        portENTER_SWITCHING_ISR();

        /* Variables can then be declared, but MUST be declared as static. */
        static char cSwitch;

            /* ISR C code goes here... */
            /* If a context switch is required cSwitch should be set to a */
            /* non zero value, otherwise it should be set to zero. */

        /* This MUST be the last line in the function. */
        portEXIT_SWITCHING_ISR( cSwitch );
    }
See the file FreeRTOS/Demo/H8S/RTOSDemo/serial/serial.c for an example of both types of ISR.
To use a processor other than the H8/S2329
-
The file FreeRTOS/Demo/H8S/FreeRTOSConfig.h includes the '2329S.h' header file. This defines register locations
specific to the H8/S2329 processor and may require modification if used with a different processor.
-
The HEW simulator requires the memory map and memory resource to be defined. As supplied both are configured for the
H8/S2329 executing in mode 7 (single chip mode) and will require modification if you wish to simulate a different processor
or a different operating mode.
-
Finally, the linker is configured as per the H8/S2329 memory map and will require updating for use with any other processor.
To view the linker configuration, select the "Options | Linker" menu item, then select the Sections tab in the resultant
window.
 Changing the memory map Changing the memory map
Switching between the pre-emptive and co-operative RTOS kernels
Set the definition configUSE_PREEMPTION within FreeRTOS/Demo/H8S/FreeRTOSConfig.h to 1 to use pre-emption or 0
to use co-operative.
Compiler options
As with all the ports, it is essential that the correct compiler options are used. The best way to ensure this is to base your
application on the provided demo application project file - as described in the
Source Organization section.
Trap instructions
As downloaded, TRAP 0 is utilised by the RTOS kernel. To use an alternative number update the line:
#define portYIELD() asm volatile( "TRAPA #0" );
found in FreeRTOS/Source/portable/GCC/H8S2329/portmacro.h.
Timer usage
The processor TPU timer 1 is used to generate the RTOS tick.
Memory allocation
FreeRTOS/Source/Portable/MemMang/heap_2.c is included in the H8/S demo application project to provide the memory allocation required
by the real time kernel.
Please refer to the Memory Management section of the API documentation for
full information.
Serial port driver
It should also be noted that the serial drivers are written to test some of the real time kernel features - and they are not
intended to represent an optimised solution. In particular they do not make use of the DMA peripheral. The bit rate register
settings are correct for a 22.1184MHz clock.
Copyright (C) Amazon Web Services, Inc. or its affiliates. All rights reserved.
|