|
|||||||||||||||
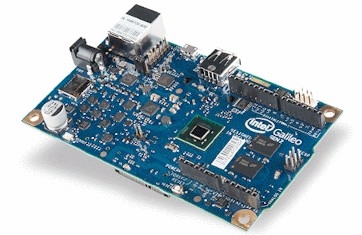
FreeRTOS on the Intel® Galileo
|
|||||||||||||||


|
|
|
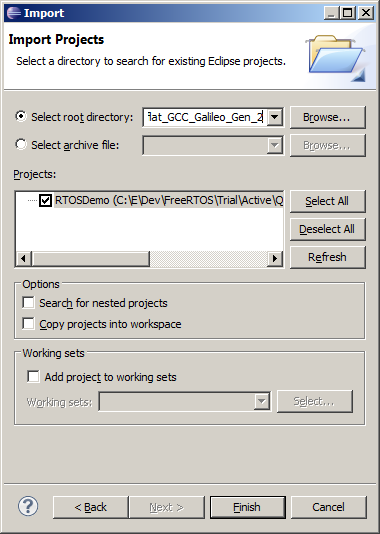
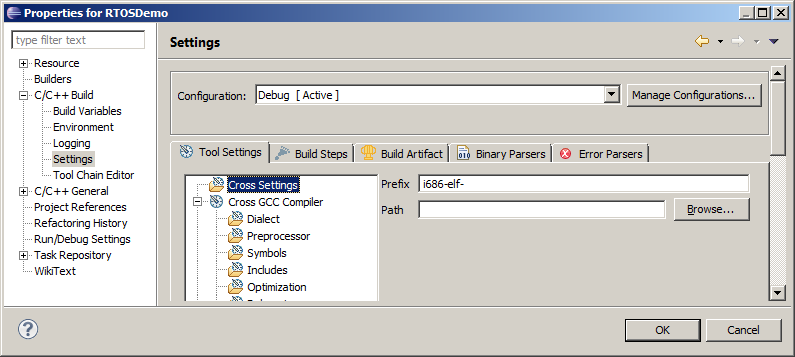
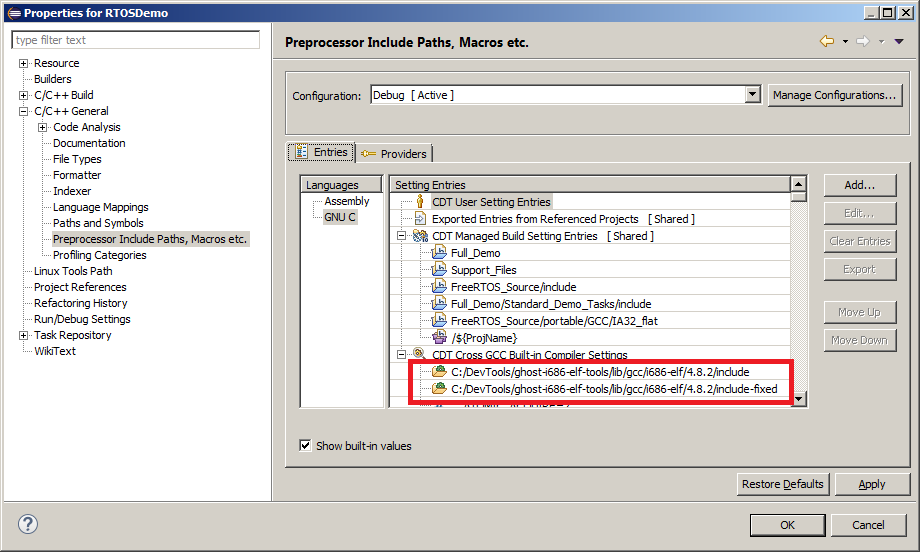
Project options that should get set automatically
|
|
If you receive errors such as "Symbol NULL could not be resolved" or "Type size_t could not be resolved" then it is likely you will have to set the path to the header files manually in the project options.
Running the RTOS Demo on the Galileo Gen 2 Board
The RTOS demo executable can be booted on the Galileo board from an SD card. A multi-boot GRUB image is used for this purpose. The GRUB configuration enables the Galileo to boot into either FreeRTOS, or Linux. Booting into Linux allows the RTOS demo executable to be updated over the network.Full instructions for creating the GRUB image are provided in the pdf file provided on this link. For simplicity, a pre-built SD card image is also provided on this link. Brief instructions on using the pre-built SD card image are provided below. Refer to the pdf file for full instructions.
It may be necessary to update the Galileo firmware before proceeding - instructions for updating the firmware are provided in the same pdf file.
The SD card must be formatted as FAT or FAT32, be 32G bytes or smaller, and SDHC format. SDXC format is not supported.
Creating the initial bootable SD card
To create the initial bootable SD card from a Windows host:- Open a command prompt (cmd.exe) as an administrator.
- Run diskpart.exe in the command prompt to start the diskpart utility.
-
Enter the following diskpart commands:
- select volume n [where 'n' is the drive letter assigned to the SD card by windows. For example, if the SD card was drive z, then you would enter 'select volume z'.]
- clean
- create part primary
- active
- format quick label="BOOTME"
- exit
- Unzip the pre-build SD image into the root of the partitioned and formatted SD card, such that the root of the SD card contains the boot folder, and the bzImage (and other) file.
- Copy the RTOSDemo.elf file created when the RTOS demo was built into the /kernel directory on the SD card.
Using the SD card to boot FreeRTOS
To boot FreeRTOS from the SD card:- Connect the Galileo to a host computer running a dumb terminal program (such as Tera Term) using a suitable serial cable. The connection uses 115200 baud, no parity, 8 data bits and no stop bits.
- After following the instructions above to create the SD card, insert the SD card into the slot on Galileo Gen 2 hardware.
- Reset the Galileo board.
-
The boot options menu will be displayed in the dumb terminal. Select "Multiboot
GRUB", or simply let the menu time out as Multiboot GRUB is the default selection.
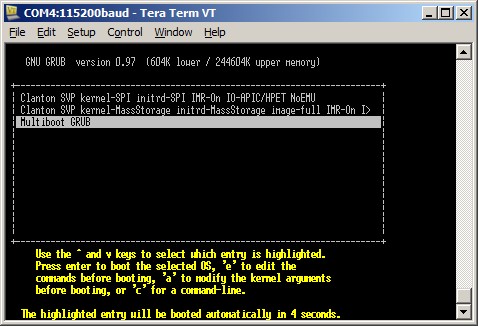
The boot options menu -
The Multiboot GRUB menu will then be displayed in the terminal. Select "FreeRTOS Demonstration",
or simply let the menu time out as FreeRTOS Demonstration is the default selection.
The RTOS demo will start to execute.
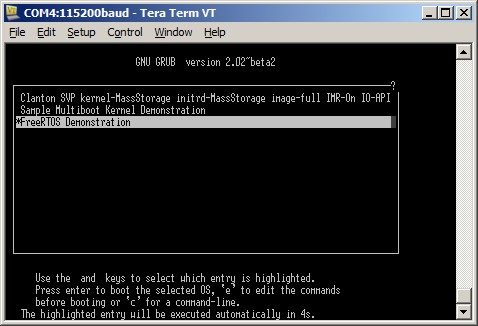
The multiboot GRUB menu
Updating the RTOS executable using SCP (across the network)
Subsequent updates to the RTOS demo elf file can be copied onto the SD card by booting the Galileo into Linux, then using WinSCP. As supplied, the SD card used to boot FreeRTOS on the Galileo board will use the 192.168.0.10 IP address, so the host computer will need to have a compatible IP address on the same local network.To update the RTOS demo elf file using SCP:
- If not already installed, download and install WinSCP, or other compatible SCP client.
- Reboot the Intel Galileo hardware, this time use the multiboot GRUB menu to select "Clanton SVP kernel", which will boot Linux instead of FreeRTOS.
- Wait for Linux to boot, entering "root" as the username and "intel" as the password when prompted.
- Ensure the Galileo board is connected to the same network as the host computer before starting WinSCP.
-
Create then connect a WinSCP session using the settings shown in the image below.
The password is 'intel'.
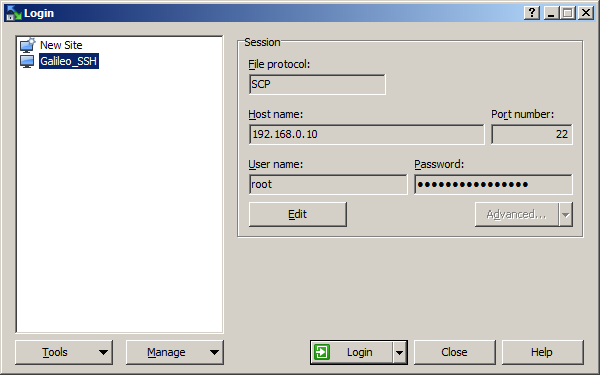
The necessary WinSCP session settings -
Once WinSCP has connected, copy the new RTOS demo elf file into the "/media/realroot/kernel"
directory, as shown in the image below.
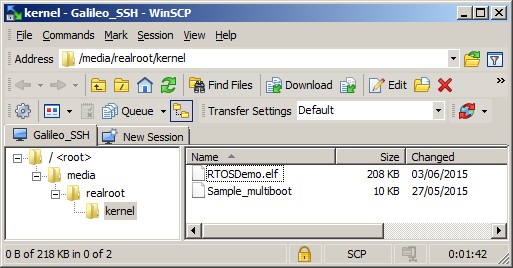
The directory into which updated FreeRTOS images must be copied - Enter "reboot" in the Linux command console. That will ensure the updated elf file is committed to the SD card before rebooting the Galileo into FreeRTOS.
Debugging the RTOS Demo on the Galileo Gen 2 Board
Eclipse, OpenOCD and GDB can be used to download, run, and debug updated executables, without needing to reboot the hardware. A JTAG debug interface is required. The demo was created and tested using an ARM-USB-OCD-H pod from Olimex, with an ARM-JTAG-20-10 adapter.These instructions download an image to RAM only, so the updated image will not be persistent, and will not be available after the Galileo has been reset.
To download a new RTOS demo executable to RAM, then start a debug session:
- If not already installed, download and install OpenOCD.
- Connect the Galileo Gen 2 evaluation board to the host computer using a suitable FTDI based JTAG adapter.
-
Open a command console, navigate to the directory in which openocd.exe
was installed, and execute the following command to start OpenOCD with
the required configuration. Note the command should be entered on a
single line, and assumes the ARM-USB-OCD-H interface is being used.
openocd.exe -f ..\scripts\interface\ftdi\olimex-arm-usb-ocd-h.cfg -f ..\scripts\board\quark_x10xx_board.cfg - Boot the Galileo into FreeRTOS, as described above.
-
In Eclipse, use the "Run->Debug Configurations..." menu item to create
a new debug configuration, as shown in the images below.
Click the images to enlarge
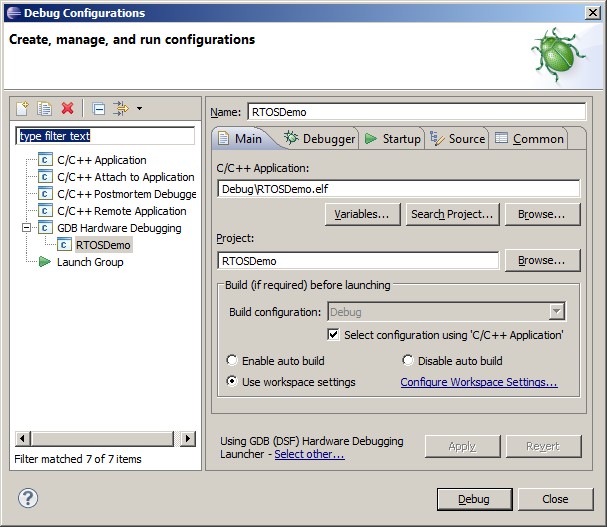
Creating a debug configuration - step 1
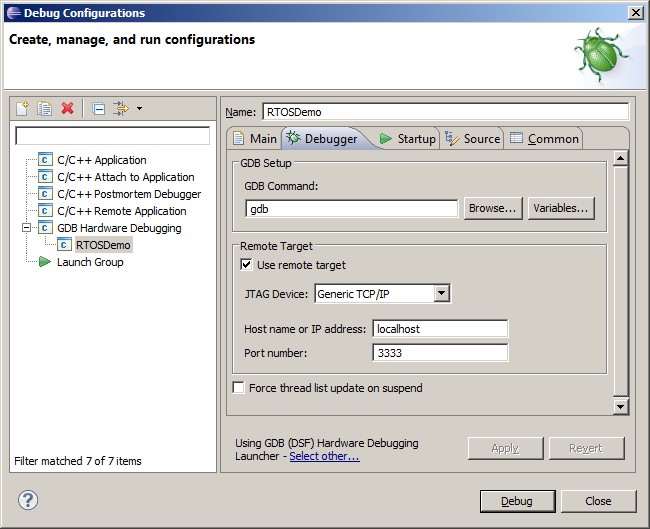
Creating a debug configuration - step 2
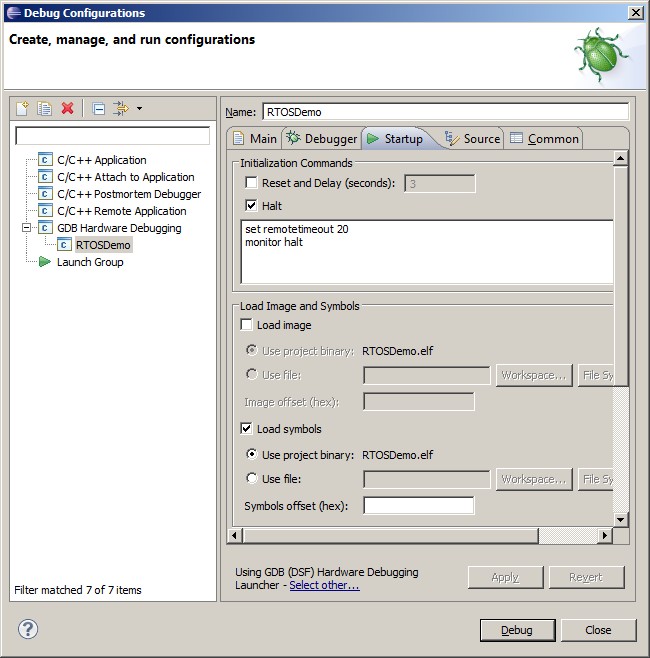
Creating a debug configuration - step 3.
Options that are not visible in the image are left empty - Click "Debug" to connect to the Galileo using GDB. See the debug troubleshooting tips below.
-
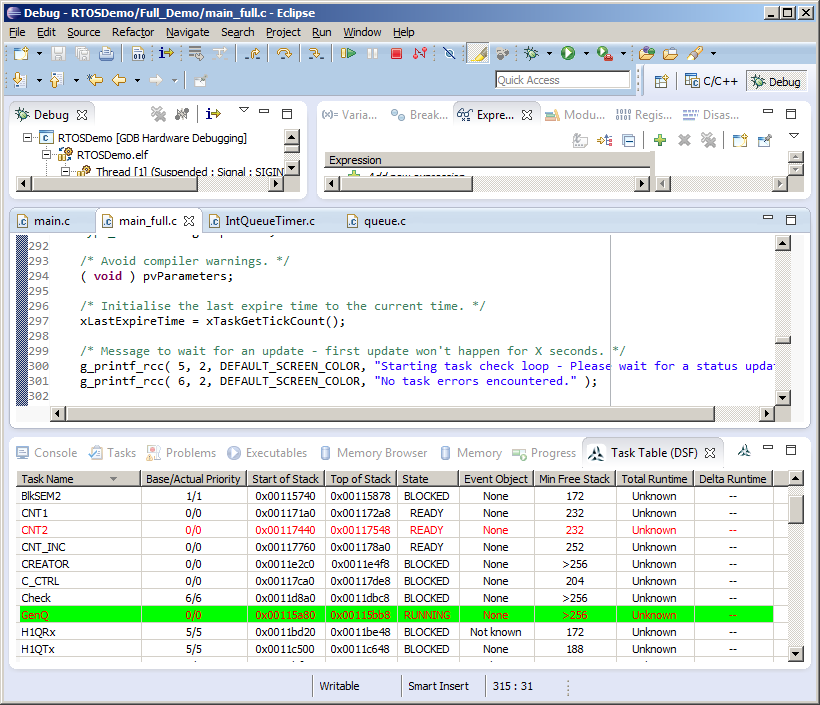
Multiple consoles are available within the Eclipse IDE. Select the GDB console
as shown below:
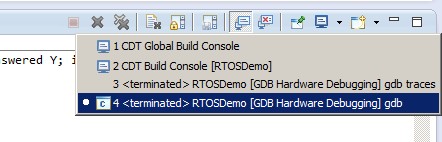
Selecting the GDB console in Eclipse -
In the GDB console, enter the following commands, replacing [enter path]
with the correct path to the RTOS demo elf file for your installation.
See the debug troubleshooting tips below. The following commands can be
added to a script for simplicity.
monitor reg eflags 0x0
flushregs
echo Downloading elf file.  Please wait.
monitor load_image C:[enter path]/RTOSDemo.elf 0
symbol-file C:[enter path]/RTOSDemo.elf
set $eip=_restart
c
The RTOS demo elf file should download to RAM, which takes some time, and then start executing.
-
If the correct source line, or assembly code line, is not displayed when
a debug session is first started, then try a single stepping operation in
the debugger. Sometimes that will result in a refresh, and then the
correct code will be shown.
-
Keep an eye on the console window in which OpenOCD is running. If it
starts to show "invalid memory" errors then it may be necessary to reset
everything, and restart OpenOCD.
-
If you are developing by downloading images to RAM, and you want to have
the debugger stop on entry to main, then add "b main" (breakpoint at
main) command before the "c" (continue) command in step 8 of the instructions
above.
-
If you are developing by copying new RTOS images to the SD card, then
rebooting the Galileo, and you want the debugger to stop on entry to main,
then set the #define mainWAIT_FOR_DEBUG_CONNECTION to 1 at the top of the
main.c source file. That will cause the application to sit in a loop
at the top of main(), giving you the opportunity to connect the debugger
before the application starts executing properly. Once the debugger is
connected it can be used to change the value of ulExitResetSpinLoop to
any non-zero value, and in so doing, exit the loop. The loop can also be
exited by pressing a key in the console.
RTOS Configuration and Usage Details
FreeRTOS Intel IA32 run-time model
The FreeRTOS IA32 (x86) port uses a flat 32-bit memory space, [currently] runs all tasks with full privileges, and does not use the MMU.
FreeRTOS Intel IA32 port specific configuration
Configuration items specific to this demo are contained in FreeRTOS/Demo/IA32_flat_GCC_Galileo_Gen_2/FreeRTOSConfig.h. The constants defined in this file can be edited to suit your application.The following Intel IA32 target specific constants are required in addition to the standard FreeRTOS configuration constants:
-
configISR_STACK_SIZE
FreeRTOS will switch the stack in use to a dedicated interrupt/system stack on interrupt entry. configISR_STACK_SIZE defines the number of 32-bit values that can be stored on the system stack, and must be large enough to hold a potentially nested interrupt stack frame.
Using a separate system stack means the stacks allocated to tasks can all be smaller, as they do not each need to include space for a nested interrupt stack frame.
Changing this parameter necessitates a complete clean and rebuild to ensure the assembly files are also re-built.
-
configSUPPORT_FPU
If configSUPPORT_FPU is set to 1 then tasks can opt to have a floating point context (the floating point registers will be saved as part of the task context).
Tasks are not created with an FPU context and must not use any FPU instructions until after they have called vPortTaskUsesFPU().
void vPortTaskUsesFPU( void );
vPortTaskUsesFPU() function prototype
If configSUPPORT_FPU is set to 0 then floating point instructions must never be used.Changing this parameter necessitates a complete clean and rebuild to ensure the assembly files are also re-built.
-
configUSE_COMMON_INTERRUPT_ENTRY_POINT
If configUSE_COMMON_INTERRUPT_ENTRY_POINT is set to 0 then all interrupt service routines need a short assembly code entry point. The assembly code wraps the interrupt handler in the FreeRTOS portFREERTOS_INTERRUPT_ENTRY and portFREERTOS_INTERRUPT_EXIT macros, which handle interrupt entry and exit respectively. See the Interrupt Service Routines section for an example.
If configUSE_COMMON_INTERRUPT_ENTRY_POINT is set to 1, then interrupt service routines can also be written as standard C functions, in which case interrupt entry and exit is handled by common code within the FreeRTOS port layer. See the Interrupt Service Routines section for an example.
Writing an interrupt handler that provides its own assembly file wrapper is slightly more complex than using the common interrupt entry point, but interrupt entry will be faster and always deterministic.
-
configMAX_API_CALL_INTERRUPT_PRIORITY
The FreeRTOS Quark port implements a full interrupt nesting model.
Interrupts that are assigned a priority at or below configMAX_API_CALL_INTERRUPT_PRIORITY can call interrupt safe API functions and will nest.
Interrupts that are assigned a priority above configMAX_API_CALL_INTERRUPT_PRIORITY cannot call any FreeRTOS API functions, will nest, and will not be masked by FreeRTOS critical sections (although all interrupts are briefly masked by the hardware itself on interrupt entry).
FreeRTOS functions that can be called from an interrupt are those that end in "FromISR". FreeRTOS maintains a separate interrupt safe API to enable interrupt entry to be shorter and faster, and to enable all API functions to be simpler and smaller.
User definable interrupt priorities range from 2 (the lowest) to 15 (the highest).
Interrupt Service Routines
Interrupt service routines (ISRs) can be written in two different ways, as follows:-
As standard C functions
This method can only be used if configUSE_COMMON_INTERRUPT_ENTRY_POINT is set to 1. The interrupt handler must be installed using the xPortRegisterCInterruptHandler() function.
/*
 * pxHandler:       Pointer to the function that implements the ISR.
 * ulVectorNumber:  The interrupt vector number to which the ISR will be
 *                  assigned.  Vector numbers can be between 34 (in the
 *                  lowest priority group) and 255 (in the highest priority
 *                  group).
 */
BaseType_t xPortRegisterCInterruptHandler( ISR_Handler_t pxHandler,
                                           uint32_t ulVectorNumber );
The xPortRegisterCInterruptHandler() function prototype
This is the simplest of the two methods, but incurs a slightly longer interrupt entry time. Interrupts are enabled before the ISR (the C function) is called.The example below is a cut-down version of an interrupt used in the RTOS demo project.
/* The function that implements the ISR is a standard C function. */
static void vHPETIRQHandler0( void )
{
    /* Perform ISR processing here. */

    /* Clear the interrupt in the IP API.  It is not necessary to
    clear the interrupt in the local API - that is done by FreeRTOS. */
    hpetIO_APIC_EOI = hpetHPET_TIMER0_ISR_VECTOR;
}
/*-----------------------------------------------------------*/

/* The C function is then installed as the handler for vector 100 using the
following code. */
xPortRegisterCInterruptHandler( vHPETIRQHandler0, 100 );
Implementing an ISR as a standard C function
-
As standard C functions that are called from an assembly code entry point
The assembly code wraps the interrupt handler in the FreeRTOS provided portFREERTOS_INTERRUPT_ENTRY and portFREERTOS_INTERRUPT_EXIT macros. The interrupt handler must be installed using the xPortInstallInterruptHandler() function.
/*
 * pxHandler:       Pointer to the assembly code stub that wraps the ISR.
 * ulVectorNumber:  The interrupt vector number to which the ISR will be
 *                  assigned.  Vector numbers can be between 34 (in the
 *                  lowest priority group) and 255 (in the highest priority
 *                  group).
 */
BaseType_t xPortInstallInterruptHandler( ISR_Handler_t pxHandler,
                                         uint32_t ulVectorNumber );
The xPortInstallInterruptHandler() function prototype
This method can always be used. It is slightly more complex than method 1, but benefits from a faster and deterministic interrupt entry time. The application writer can re-enable interrupt before calling the C portion of the ISR if desired.The example below is a cut-down version of an interrupt used in the RTOS demo project.
/* The function that implements the C portion of the ISR.  This is the
function called from the assembly code wrapper. */
void vHPETIRQHandler1( void )
{
    /* Perform ISR processing here. */

    /* Clear the interrupt in the IP API.  It is not necessary to clear the
    interrupt in the local API - that is done by FreeRTOS. */
    hpetIO_APIC_EOI = hpetHPET_TIMER1_ISR_VECTOR;
}
/*-----------------------------------------------------------*/

/* The assembly code wrapper that calls the C function shown immediately
above.  The wrapper must be implemented in an assembly file, not a C file.

The interrupt entry point assembly code makes use of the
portFREERTOS_INTERRUPT_ENTRY and portFREERTOS_INTERRUPT_EXIT macros,
so ISR_Support.h must be included.  ISR_Support.h is located in the
FreeRTOS/source/portable/GCC/IA32_flat directory. */
#include "ISR_Support.h"

.align 4
.func vApplicationHPETTimer1Wrapper
.extern vHPETIRQHandler1
vApplicationHPETTimer1Wrapper:

    /* FreeRTOS macro that handles interrupt entry.  Must be called
    first. */
    portFREERTOS_INTERRUPT_ENTRY

    /* It is safe to enable interrupts here, if desired. */
    sti

    /* The rest of the ISR is implemented in C.  Call the C function
    now. */
    call vHPETIRQHandler1

    /* FreeRTOS macro that handles interrupt exit.  Must be called
    last. */
    portFREERTOS_INTERRUPT_EXIT
.endfunc
/*-----------------------------------------------------------*/

/* Finally, the assembly code wrapper is then installed as the handler
for vector 100 using the following code.  This code must be in a C
file. */
extern void vApplicationHPETTimer1Wrapper( void );
xPortInstallInterruptHandler( vApplicationHPETTimer1Wrapper, 100 );
The C function called from the assembly code wrapper
If an ISR causes an RTOS task of equal or higher priority than the currently executing
task to leave the Blocked state (see the description of the pxHigherPriorityTaskWoken
parameter in the API documentation for functions such as
xSemaphoreGiveFromISR())
then the ISR must request a context switch before
the ISR exits if it wants the unblocked task to execute immediately. When this
is done, the interrupt will interrupt one RTOS task, but return to a different
RTOS task.
The macro portYIELD_FROM_ISR() (or portEND_SWITCHING_ISR()) is used to request a context switch from within an ISR. The following source code snippet is provided as an example. The ISR in the example uses a task notification to synchronise with a task (not shown), and calls portYIELD_FROM_ISR() to ensure the interrupt returns directly to the unblocked task.
The application writer may choose not to call portYIELD_FROM_ISR() if it is known that the interrupt did not necessitate any immediate processing - for example, if the interrupt was a character arriving, but more characters are needed before the message being received is complete and ready for processing.
void Dummy_IRQHandler( void )
{
long lHigherPriorityTaskWoken = pdFALSE;

    /* Clear the interrupt if necessary. */
    Dummy_ClearITPendingBit();

    /* This interrupt does nothing more than demonstrate how to synchronise a
    task with an interrupt.  A task notification is used for this purpose.
    Note lHigherPriorityTaskWoken is initialised to pdFALSE. */
    vTaskNotifyGiveFromISR( xTaskHandle, &lHigherPriorityTaskWoken );

    /* If the notified task was blocked waiting for the notification, and the
    unblocked task has a priority higher than or equal to the currently Running
    task (the task that this interrupt interrupted), then
    lHigherPriorityTaskWoken will have been set to pdTRUE internally within
    vTaskNotifyGiveFromISR().  Passing pdTRUE into the portYIELD_FROM_ISR() macro
    will result in a context switch being pended to ensure this interrupt returns
    directly to the unblocked, higher priority, task.  Passing pdFALSE into
    portYIELD_FROM_ISR() has no effect. */
    portYIELD_FROM_ISR( lHigherPriorityTaskWoken );
}
An example interrupt handler
|
Only FreeRTOS API functions that end in "FromISR" can be called from an
interrupt service routine - and then only if the priority of the interrupt
is less than or equal to that set by the configMAX_API_CALL_INTERRUPT_PRIORITY
configuration constant.
Resources used by FreeRTOS
FreeRTOS uses the local APIC timer, and interrupt vectors 0x20 and 0x21. In addition, the demo project uses the UART, GPIO, Legacy GPIO, I2C and HPE timers.Memory allocation
Source/Portable/MemMang/heap_4.c is included in the Intel IA32 demo application project to provide the memory allocation required by the RTOS kernel. Please refer to the Memory Management section of the API documentation for full information.Miscellaneous
Note that vPortEndScheduler() has not been implemented.
NXP tweet showing LPC5500 (ARMv8-M Cortex-M33) running FreeRTOS.
Meet Richard Barry and learn about running FreeRTOS on RISC-V at FOSDEM 2019
Version 10.1.1 of the FreeRTOS kernel is available for immediate download. MIT licensed.
View a recording of the "OTA Update Security and Reliability" webinar, presented by TI and AWS.
FreeRTOS and other embedded software careers at AWS.

![]()


![]()